SDA Cloud Administrative Functions
These administrative tasks will largely be performed by the SDA Manager/SalesDoc Architect Administrator, or with their direction. Depending on your company-specific configuration and setup, the instructions may vary slightly from what is listed in this documentation section.
Installing SDA Cloud
- Download and install the SalesManager desktop app from Here
- Open up SalesDoc Architect (SDA) and click ARCHITECT, SETUP, and REGISTER as SDA Cloud user.
- When prompted, enter your username (i.e., your email address) and password.
- If you do not know your username and password, email CorsPro Support.
User Maintenance
Administrators will access the Administration functionality by selecting the ADMINISTRATION option on SDA Cloud’s Main page, and then accessing the Pull Down menu and selecting USERS.
Administrators have the authority to Add Users, Delete Users, Edit User’s information (such as a last name change or a spelling correction). They can Change a User’s Password, Email User Password, Assign/Re-Assign Users to Managers. Revisions can be made quick and easy, by clicking into a text field on the Users Grid.
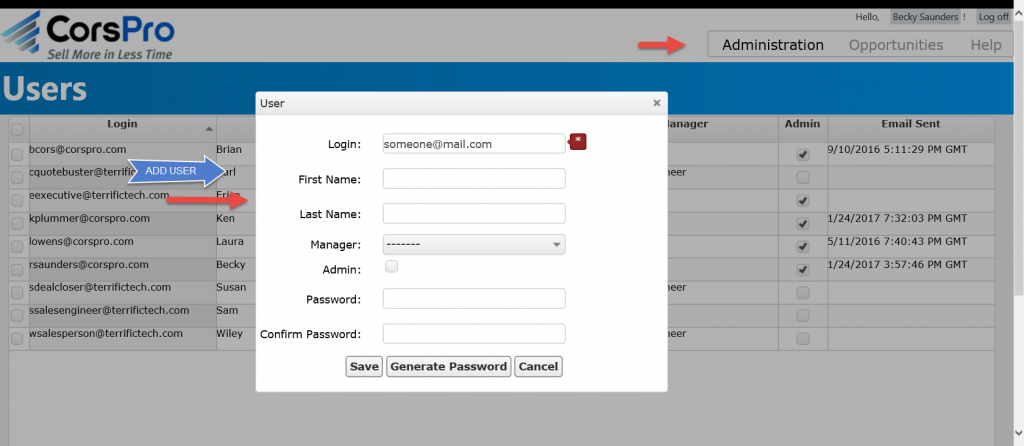
Add a User
The Administrator will have the authority to add a new user. Follow the steps below to add a new user to SDA Cloud.
- Click the ADD button at the bottom of the Users screen. A User pop up window will be shown.
- Assign a login for the user (we highly recommend their company email address.)
- In the first name field, enter the user’s first name.
- In the last name field, enter the user’s last name.
- Select the user’s manager name from the pull down menu.
- If the user will have an administrative role, check the admin box.
- Click the GENERATE PASSWORD button for a system generated password OR
- If you prefer to set the users password, type the password in the field and re-enter the users password.
- Click the SAVE button.
**Reminder: let your users know they will have to register as a cloud user from within SDA.**
Email Password
The Administrator can choose to have users passwords and a link to download the SDA Cloud setup file, emailed to the users
- Select the checkbox in front of one or more users to send password via email.
- Click the EMAIL PASSWORD button.
Reset Password
When a user needs to change their password, the Administrator can do so using this function.
- Navigate to the Users screen, under the Administration option.
- Check the box in front of the user for whom you wish to reset their password.
- Click the GENERATE PASSWORD button for a system generated password OR
- Click the RESET PASSWORD button and type in the new password and re-enter the new password in the Confirm Password field
- Click the SAVE button.
Reassign the Manager
If a user is switching groups or is assigned a new manager, you can change this association from the Administration option, and then selecting USERS from the drop down menu.
- Check the box in front of the user you want to reassign to a different manager.
- Go to the Manager Field and click on the down arrow to see a list of available Managers.
- Click on the name of the Manager to which you want to reassign the user.
Delete a User
To permanently delete a user from having access to SDA Cloud, the Administrator should:
- Check the box in front of the users name to delete.
- Click the DELETE button at the bottom of the screen.
- A Confirmation box will be shown asking you to confirm your selection.
- Click the OK button.
Opportunity Stages
From this view the Administrator can add (setup) Opportunity Stages, give an Opportunity Stage a name, set the probability associated with a stage, determine the stage types, set which stage will be the default stage and also set the order it will appear in drop down list the users will see. Most users find it helpful to have the stages they create in SDA Cloud mirror the stages they have defined in their CRM system, because this provides consistency and a common language between tools you use to manage your sales process. There is no limit on the number of stages you can define.
From the Administration Option on the SDA Cloud Main screen, go to the Pull Down menu and select Opportunity Stages.
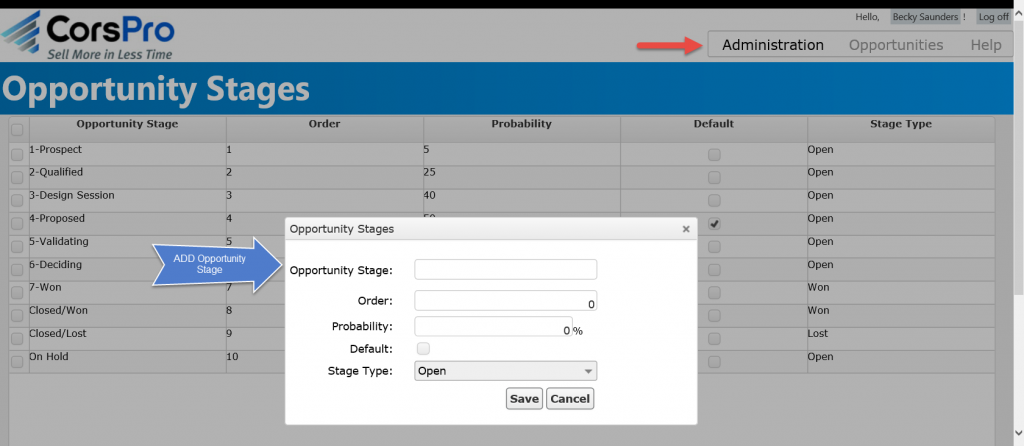
Add an Opportunity Stage
- Click the ADD Button.
- Enter Opportunity (Category) stage name.
- In the Order Field type the number it will appear in the list (lowest number goes at the top of the list.)
- Type in the % of Probability to be associated with this stage.
- Check the Default box if this will be the default.
- From Stage Type select Open, Won or Lost from drop down
- Click the SAVE button.
Delete an Opportunity Stage
- Click the box in front of the Opportunity Stage you want to delete.
- Click the DELETE button.
- Confirmation box will be shown confirming your selection.
- Click the OK button.
Please note that you cannot delete an Opportunity Stage, if that stage is currently in use on your opportunity grid. Locate that opportunity and re-assign the stage to an existing stage and then you can delete the stage.
Edit an Opportunity Stage
- Click in the field you wish to edit.
- Type your changes in the field.
- Click our of the field, your changes will be saved.
Client Defined Fields
From this view, the Administrator defines TEXT fields that will be pushed to the opportunity grid in
the cloud. The data is only pushed from the desktop when the opportunity is first set up. The Administrator can also define TEXT or NUMERIC fields that are pushed to the quote level view in the cloud. The administrator must select from the list of Excel Named Ranges within the SDA quote file (on any tab) from which data will be pulled.
As quote level updates are made at the desktop within the quote files, the text and numeric data will be
updated at the quote level in the cloud, and numeric fields will be re-totaled and displayed on the opportunity grid in the cloud.
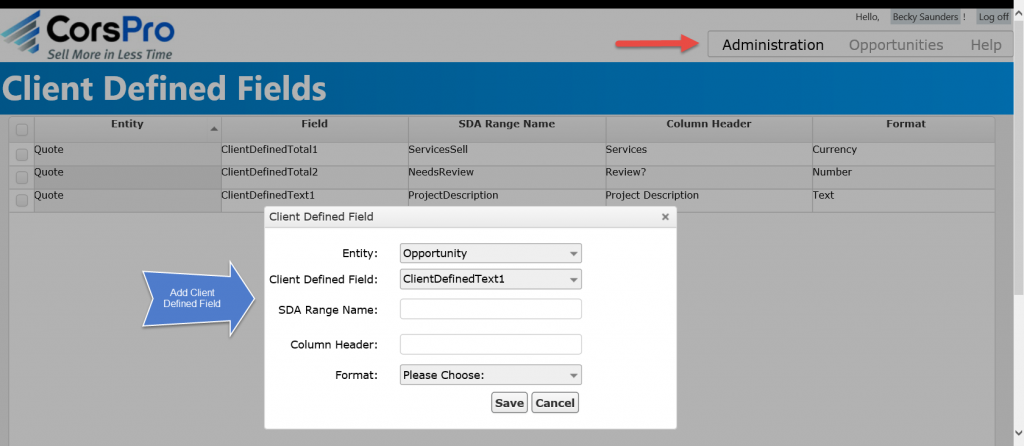
Add a Client Defined Field
- Go to Administration option on SDA Cloud’s main page
Select CLIENT DEFINED FIELDS - Click the ADD button
- In the Entity field select either OPPORTUNITY or QUOTE, grid which data will be displayed.
- In the Client Defined Field select the hard coded field name from the pulldown. If the name contains “Text” within it, then it’s a text field. If the name contains “Total” within it, then it’s a numeric field. For quotes, there are 5 text and 10 numeric fields to select from. For opportunities, there are 5 text fields from which to choose.
- In the SDA Range Name, enter the name of the Excel range in the SDA quote file from which the data should be pulled.
- Column Header field: enter the text that should be displayed as the column header in the quote or opportunity view, as appropriate.
- From the Format pull down select TEXT, NUMERIC, or CURRENCY($)
- Click the SAVE button
Edit a Client Defined Field
The administrator can go directly into the fields on the main Client Defined Fields page to make edits. Just click in the fields: Entity (select from pull down, Field (select from pulldown, SDA Range, Column Header and then type the changes.
Delete a Client Defined Field
- Check the box in front of the Client Defined Field to be deleted
- Click the DELETE button
- Click the OK button when the confirmation window displays
Uninstalling SDA Cloud
You can uninstall SDA Cloud using one of the following two approaches:
- Click the START button from the Windows system panel, then select PROGRAMS, then locate the
CorsPro folder. Select “Uninstall SDA Cloud”. Your CorsPro application will be removed –
but not your SDA quote files. - Click the START button from the Windows system panel, open the CONTROL PANEL, and
select PROGRAMS/PROGRAMS and FEATURES. Locate and select “CorsPro’s SalesDoc Architect
SDA Cloud” in the list and then click UNINSTALL to remove the software.
Next, delete the CorsPro file containing your opportunity information, which is usually
C:/CorsPro/User/SalesMgr.mdb. Note that your file location may be different, if you did not
install SDA to the C:/CorsPro folder.
Return to SDA Cloud User Guide Main Page