Getting Started
Basic 5-Step Process for Configuring a Solution
It’s easy to enter information into a SalesDoc Architect tab, and to move around and view summaries of what has been configured on a particular tab. Below are some tips for entering information into and viewing information on a SalesDoc Architect tab:
- Cells that can accept user input are designated with a blue All other cells are protected and will not accept user input.
- To navigate around a tab, use the Jump button to “jump” from section to section with a particular tab.
- Use the Filter button to view a summary of the items that have been configured on a particular tab; clicking the Filter button a second time will switch the tab back to a “show all” view whereby all parts (configured and non-configured) will be displayed.
You should also review the Function Button Overview to gain an understanding of the purpose and use of each of SalesDoc Architect’s function buttons (accessed via the Add-Ins tab in Microsoft Excel). For help with installing SalesDoc Architect, see the Help section on Installing SalesDoc Architect.
If you are looking to install SalesDoc Architect so that users have access to data and updates via a shared drive, see the Help topic on Setting Up SalesDoc Architect to Work on a Network. To install the Word2Excel integration with your CRM or contact management system, see the Integration with CRM & Contact Management Systems Help topic. Both options (network setup and CRM integration) are available for SalesDoc Architect Pro subscribers only.
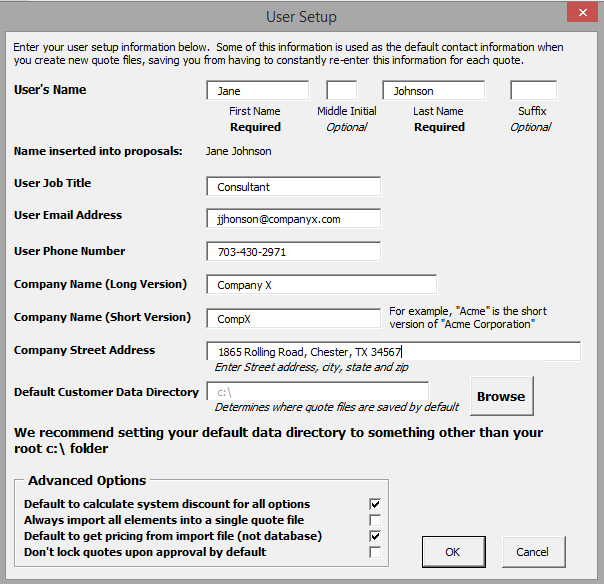
The first time you open up SalesDoc Architect, you should update the default user information (such as your name, company and address) by clicking the “Architect” button, then “Setup”, then “User Setup”. Once entered, this information will automatically be entered into the Base Info tab fields for all new quotations, saving you from having to type in this information for all new quotes that you create.
Configuring a Solution using SDA
Generating a quotation from SalesDoc Architect is a simple 5-step process. Now, let’s get started!
Step 1: Enter Basic Info on the Base Info Tab
When SDA is launched, it opens to the Base Info Module. This module displays important information about the quote file. It is here that users will enter information pertaining to their customer and quote (left hand side of module)
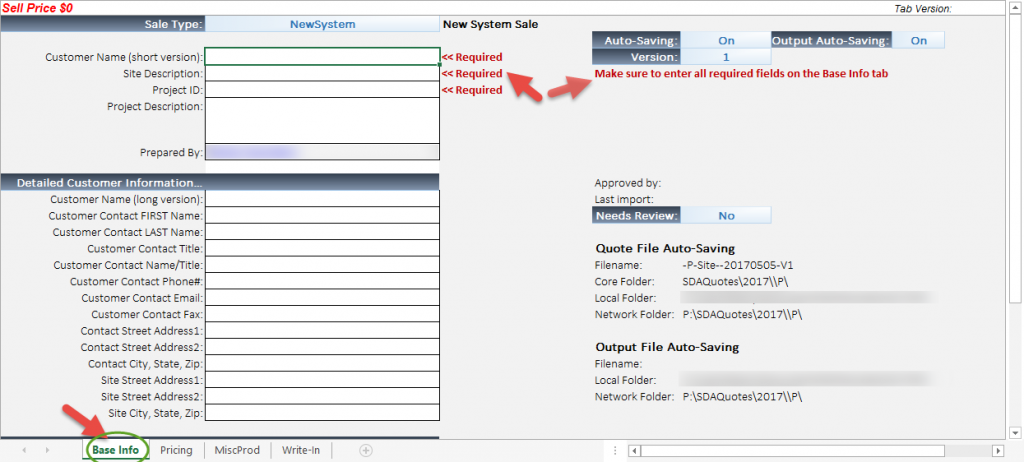
 System controllers will only be configured if Sale Type is “New System”.
Sale Type – (New System, Add/Delete to New System or Post-Cutover Sale).
Customer Name (short version) Required Field – The short version of the Customer Name will appear on most outputs that will be created for this client.
Site Description Required Field – Enter a brief description, for instance Boston, Harrisburg
Project ID Required Field – Project Identifier for the quote
Sold To Type – (if present on Tab)
Country – (if present on Tab)
Language – (if present on Tab)
Detailed Customer Information – On this section of the Base Info Module, users will enter specific information about the customer (name, address, phone, email, fax)
Quotation Reference Information – This section will allow users to enter information as, order date, job number, P.O number, Agreement number, just to name a few.
Seller Information – In this section information about the company and salesman will be entered (some data will default from setup). There will be a field to enter Comments, if needed.
On the right-hand side of this module users will see information pertaining to the file:
- File Name and Location saved
- Options to set Auto Saving and Output Auto Saving to YES or NO
- If the company (Architect Manager) has set up a process for quotes to be reviewed, users can choose that option here
- Version number of the quote

Depending on the outputs you want to create, you can enter other information onto this tab as well. For example, if you want to generate a statement of work, you should fill out the fields in the “Detailed Customer Information” section and enter the agreement and statement of work numbers.
Step 2: Configure the Core Products
- Option 1: Get Excel-Based Product Tabs
- Click the “Get Tabs” button, and select one or more products that you would like to configure, then click “Open”. You can select several products at once by holding the control key while you are selecting the products.
- Once the product tabs are inserted into SalesDoc Architect, you can configure the products in a variety of ways, depending on the product. For many product tabs, you will configure a system using an “outside-in” approach. For example, for a PBX you might select the type of system, then select the trunks and phone sets required for the solution. SalesDoc Architect will then configure the “insides” of the system — such as line cards, cabinets and user licenses — based on the specified trunks and sets.
CorsPro Client Services team can customize tabs for your company, based on your needs.
- Option 2: Import Core Product Configurations from an Outside Configurator
- SalesDoc Architect can import configurations (including part numbers and pricing) from several vendor configurators.
- In some cases, peripheral products and services associated with the imported list of parts can be automatically configured after the import is completed.
- For example, you can import a Mitel configuration from the Mitel Sales Workbench (MSW) by clicking File then Export within MSW, then switching to SalesDoc Architect and clicking the “Import” button, then “Mitel Sales Workbench config”.
Step 3: Adjust Peripheral Products and Services
Users can adjust the default configuration information for services and miscellaneous/peripheral products:
• Go to the MiscProd Tab or Dynamic SOW Tab depending on your particular SDA set-up.
• Enter or select the desired information
- Additional User Inputs
- Managed Services Assumptions
- Miscellaneous Equipment
- Services (Labor)
- Item Counts
- Internal Summary
- Project Notes
Users might select the number of UPS backup hours that they desire, or select the appropriate first year support plan
Step 4: Set Customer Discounts
- Click on the Pricing Module first enter the appropriate Pricing Category discounts. These discounts will be applied on a line-item basis so that the sell pricing for the products within a Pricing Category will be set at MSRP (manufacturer’s suggested retail price, sometimes referred to as “list price”) less the specified discount.
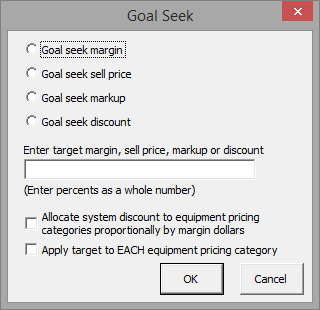
- After setting the pricing that will be applied against the line-item parts in each particular Pricing Category, you can then enter the desired System Discount that will be applied as a lump-sum discount based on a percentage of the MSRP for the entire quotation. You can also click the Goal Seek button to use the Goal Seek function to calculate the System Discount based on the total price or margin that you desire.
Step 5: Generate Outputs
Now that you’ve configured your turnkey system and set the customer discounts, you’re ready to create a variety of outputs from SalesDoc Architect. When you click the “Outputs” button, you will be presented with a list of possible outputs.
Some examples of Outputs are:
- Costumer Pricing Schedule
- Proposal
- Statement of Work (SOW)
- Order Extract
- Memos
- Discovery Memo
- Assessment Memo
- Forms
- Change Order Form
- Equipment Delivery Form
- Acceptance Form
- Work Authorization Form
- Calling Bid Form
- Master Agreement
You can also generate a Word-based SOW simply by clicking “Outputs” then “Generate Statement of Work”. Since SDA “knows” your specific configuration, it is able to select the appropriate statement of work components from the library of statement of work “sub-documents” and piece them together into a cohesive Word-based document.
Some clients use other forms, memos, documents, then what is available. If there is an output document not on list that the company generates, contact Clients Services to discuss customizing the output.
Now that you have configured a solution with SalesDoc Architect and created outputs, you can save any of these files just as you would any other Microsoft Office file. Make sure to save the quote file, which contains “live” configuration logic, so that you can later pull it up to modify it or create more outputs. You can recognize a quote file because it always starts with “Quote” and ends in some number (e.g., “Quote1”).
_________________________________________________________________________________________________________________________________________
ADDITIONAL RESOURCES
WEBINARS/VIDEOS
- How to Configure Labor and Peripherals
- Entering Contact Information
- Quickly Generate a Proposal
- Setting Customer Sell Price
- Supercharge your File Management with SDA
MANUFACTURER CONFIGURATORS (Videos)
- Importing Configurations from AVAYA’s ASD and EZQuote Tools
- Importing Configurations from Mitel’s CPQ Tool
- Importing Configurations from NEC Anytime Studio
- Importing Configurations from ShoreTel’s QMS
- Transform your NEC Anytime Studio Quote Into a Winning Proposal
DID YOU KNOW…
- What happens when quotes are created off-line, and then user comes back online
- Build better output by fully populating the Base Info Module
- Save time and gain consistency in your quote file names and the folders they are stored in using the auto-naming and auto-saving features of SDA
- Save your quote files more quickly in Excel 2013 by avoiding the “Backstage View“
Return to SDA User Guide Table of Contents